0 Cart
Added to Cart
    You have items in your cart
    You have 1 item in your cart
    Total
    Check Out Continue Shopping

    Kale and Eggs, Anyone?

    Kale and Eggs, Anyone?

    My husband was home today and we had to rush around to get him to an appointment.  I had about 15 minutes to prep something for lunch.  It is cold out and I wanted something warm.  I came up with the perfect Kale & Eggs recipe!  It actually turned out to be one of my hubby's favorite meals.  I am sharing my recipe below.  Please let me know what you think about it!


    Saute 1 diced onion and 1 diced potato in a skillet with olive oil until carmelized and brown.  Salt & Pepper to taste (I diced the potato up pretty small so that it will cook quickly)

    Add garlic  ( I am very generous when it comes to garlic because I just don't think there can ever be too much!)  Saute a little longer.  

    Remove the stems from the Kale.  You may notice in the picture that I used Red Kale in mine.  Chop up kale into bite size pieces.  Add kale to potato/onion turning off the heat and covering skillet so that the kale will wilt.  Be sure to toss the kale mixture so that the kale will be coated with the seasoning and olive oil.  Let sit 10 minutes or until the kale is wilted.  

    Cook 2 eggs per person.  Dish up kale mixture and then top with the eggs!  One of the quickest to prepare, best dishes I have ever made!

    Please share your comments and ideas below!

    Inspiring the Well-Lived Home,

    Julie Atkins

    Milkweed Farms

    Open Shelving or Not???

    Open Shelving or Not???

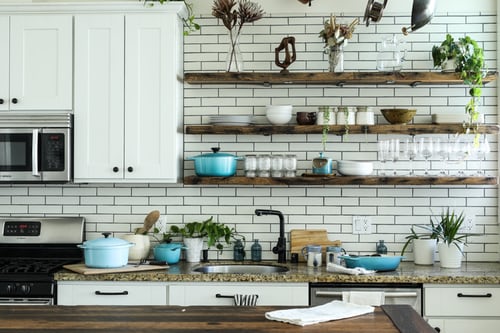
    I think that I first started loving the concept of open shelving when I was watching some tiny house videos.  The shelves that were displayed were always decorated to look so clean and pretty.  I have given much thought to the idea in my own home and although I do love the look, I haven't been persuaded to tear out my cabinets with doors just yet.  That doesn't mean that I won't next week, but upon researching it, I have found a few things to consider.

    Open shelving keeps us from hoarding stuff that we never will use because it is ....well, open for the world to see.  I opened my cabinet doors to see a few items that I had tucked into the corners that I would not have even saved if I hadn't had a place to hide it.

    Another point that is commonly brought up about open shelving is dust!  Ya, who wants to wash all of their dishes every week just to dust them out?  Well, my answer to that is not to have any more dishes sitting out than you would use on an ordinary week.  I would make an exception for pots and pans.  There are many varieties of dusting apparatus available that can help to reach those shelves with ease.  I really like to use a Swiffer Duster as the little cloths cling to the dust so I am not spreading it around the house.

    What if all of your stuff doesn't match?  Never fear!  Eclectic is here!  Combine your items in such a manner that they bring out the best in each other.  An example would be to scatter brightly colored items throughout the shelves to keep balance.  My daughter in law is a beautiful decorator and mixes pictures, copper and plants amongst her dishes on her shelves.  It really is eye catching and gives her kitchen a warm feeling!

    Be sure that you use heavy duty brackets and brace them into studs.  Dishes can get heavy! I have some heavy duty restaurant wear that can put a real load on a shelf.

    I hope that you will share your thoughts and ideas on the open shelving concept below.  If you have pictures of your own, we would love to see them!  

    Inspiring the well-lived home,

    Julie Atkins

    Milkweed Farms


     We want you to know that we participate in the Amazon Services LLC Associate Program.  If you choose to click on our link to purchase your merchandise through Amazon, we earn an advertising fee.  This fee helps support our site.

    Top Tips of 2020 to Help Keep Your Teenager's Room Clean!

    Top Tips of 2020 to Help Keep Your Teenager's  Room Clean!

    Is it even possible for a teenager to keep their room clean without an all out war?  Yes, I believe that it is!  It requires some before -hand organization and the time spent is well worth it.  Based on my own experience, I have shared some of my all time favorite tips for a happy, well-organized teenage space.

    Tip #1  I can't stress enough the importance of this first step!  Purge clothing that doesn't fit or isn't worn.  The number one cause for a messy room is not getting rid of things that don't fit or that we no longer use.

    Tip #2   Keep a file for papers, coupons, gift cards, notebooks, address books, schedules, and school papers. 

    Tip #3  Keep a to do bin.  This is a tub or bin that misc items can be tossed in until there is time to put them away.  This keeps things from piling up making their room look messy.  This bin could be a plastic or wicker bin of some sort.  Whatever matches the decor of the room.  

    Tip #4  Use wall hooks to keep clothes, coats, robes, ect off of the bed and floor.

    Tip #5  Keep a waste basket handy in the bedroom.  The best place may be next to a desk or in the bathroom.  Don't rule out the idea of having more than one if that helps to keeps things more orderly.

    Tip #5  Keep a shoe rack or bin of some sort in the closet and insist that all shoes belong in their home place.

    Tip #6  Use bins within drawers to group like items.  Example:  pencils, paperclips, make up electronics and their cords. I have included a link to my favorite bins that are washable and come in assorted sizes so that they fit nicely in any drawer Best organizational bins.

    Tip #7 Everything should have a place!  Books should have a shelf, pencils should have a holder, makeup should have a drawer or bag, sports equipment should have a bin, and last but not least, electronics should have a drawer or bin.  

    Tip #8  Make a specific day that all trashes and to-do bins should be empty and clean.

    Tip #9  Get some storage bins that fit under the bed.  This is the place to keep things that just can't be parted with but that don't get much use.  Eventually, these things usually get chosen for the purge pile the next time they have a cleaning day.

    Tip #10  I thought this sounded crazy the first time that I heard it but it really works!  If making the bed isn't an option some mornings, provide a cozy blanket that can be used on top of the spread.  This blanket can be folded up or tossed in a bin in the closet and there you have a made up bed!  Don't tell but I have actually done this myself a few times.

    I hope these tips bring a sense of organization and peace to your home.  By spending a small amount of time helping your teens get some things in place to help keep things tidy, we can reduce future stress and focus on things that really matter!

    Inspiring the well-lived home,

    Julie Atkins

    Milkweed Farms


    Get Through Winter By Making Your Own Elderberry Syrup!

    Get Through Winter By Making Your Own Elderberry Syrup!

    When the cold and flu season hits, elderberry syrup is a staple in our home!  The concoction that I make at home is so much less expensive and tastes a whole lot better than the store bought.  

    I planted 5 elderberry bushes last spring, however, it takes about 3 years to get them to produce berries.  While I am waiting for my little bushes to grow, I actually purchase the berries that I use from Amazon. I prefer Frontier Co-op Elderberries but there are quite a few brands available.  I have found that this particular brand has less stems and are cleaner than some others that I have tried.  

    My recipe is really simple and is not time consuming.  Once you have tried making it, you'll never go back to buying Elderberry Syrup!

    I do have a quick warning!  Don't eat elderberries raw.  They must be cooked or they can cause nausea, abdominal cramps and possibly vomiting.  But cooked.......they are the bomb!

    My simple recipe for making syrup is as follows:

    1 cup of dried elderberries

    4 cups of water

    1 large knuckle of ginger, sliced

    2 tsp cinnamon

    1/4 tsp cloves

    1 tsp nutmeg

    1 cup honey (Honey sweetness can vary so it is important to taste test as you go) Also, the honey is important in the immune boosting process so be sure to buy local and buy it raw!

    Add water, elderberries, sliced ginger, and spices to large pan and simmer for about an hour on low heat.  As the elderberries soften, I use a spoon with holes to smash them against the side of the pan so that I get all of the yumminess out of them that I can.  Allow the pan to cool and then strain the mixture to remove all solids before adding the honey and then bottle and store in the refrigerator.  Mine stays good up to about 3 months. 

    Please do not consider this as medical advice.  I am not a Dr.  I just want to share with you how we care for our immune systems here in our home! 

    I can't wait for you to give this a try!  Let me know how you love it!

    Inspiring the well-lived home,

    Julie Atkins

    Milkweed Farms


    Traditions Can Bring Your Family Closer!

    Traditions Can Bring Your Family Closer!

    Over the years, I have noticed that one of the key elements that bring families together to laugh, love, worship and communicate with one another are their long celebrated family traditions.  Traditions can be fun and can also be the ice breakers for families that don't get to see each other often.  I just want to visit a few that I have had in my family and also share some others.  My hope is that you will consider your own family traditions and if you don't have any, well.....maybe this is the year to start at least one!

    When I was little, Christmas Eve was always such a magical time in my family.  My grandmother prepared a beautiful dinner for my dad, his brothers and all of their families.  Each Christmas Eve the entire family met at the little church where we all attended.  The church was small and beautifully decorated using only candle light.  We would sit quietly in the pew until every member of the family had arrived.  At that time we all softly made our way to the altar where we were served communion.  After we had all had our time in contemplation and prayer we made our way to our grandma and grandpa's house where Santa had put gifts under the tree for my self and all of my cousins!  We ate and even doing the dishes afterward was a time that was shared by all while good conversation took place.

    Many families have adopted the "Elf on the Shelf" tradition.  The Elf appears on Thanksgiving night and can be found entertaining himself in a new mischievous situation each morning when the kids wake up.   If you have this tradition and your elf is finding himself bored, check out the internet for ideas for your elf  to make your kids crack up!  There are a ton of them out there.

    Maybe you have seen the Christmas pickle ornaments out there.  There are numerous stories about why the pickle became and ornament on the tree.  Most claim that it came out of Germany.  I have heard that it was a tradition that was begun out of poverty and lack of ornaments to hang on the tree.  Others offer that it was hidden on the tree waiting to be found by a child who would receive an extra gift.  

    My sister has the tradition of icing Christmas sugar cookies with all of her family.  She has them baked ahead of time and then a couple of weeks before Christmas they all come to her house and ice them.  They get pretty creative and there isn't a one of us that doesn't look forward to those cookies!

    I hope that you have a couple traditions in your family and if you don't it is never too late to start one.  Traditions make for stronger families!  Please share your tradition below!

    Inspiring a well-lived home for the holidays,

    Julie Atkins

    Milkweed Farms